How to Use Git in Your Next Project 💥
Git has revolutionized the way we manage our code, let's find out why.


What is Git & Why is it Powerful?
Git is an open source distributed version control system that allows us to collaborate and keep track of our code.
Benefits
- All developers in a team have a copy of the repository.
- Each member can branch off the main project into their own environments to make their own code changes.
- Git makes it fast and easy for members to merge their changes into the main repository.
- Pull requests allow the team to discuss what changes should be implemented into the main repository.
- Git keeps track of your commits, allowing you to "go back in time" in your code.
What is Github?
It's important to remember Git !== Github
Github is the largest, most popular code repository in the world. It is the way like-minded developers collaborate together on projects. Github is where you can view the work of others to see incredible open source projects you can help contribute to. It has all the features you need to fork and clone repositories which enables you to have your own copy of the project! It is similar to social media for developers, you have a profile that shows the projects you've worked on so you can get in touch with developers similar to you.
Setting up your project
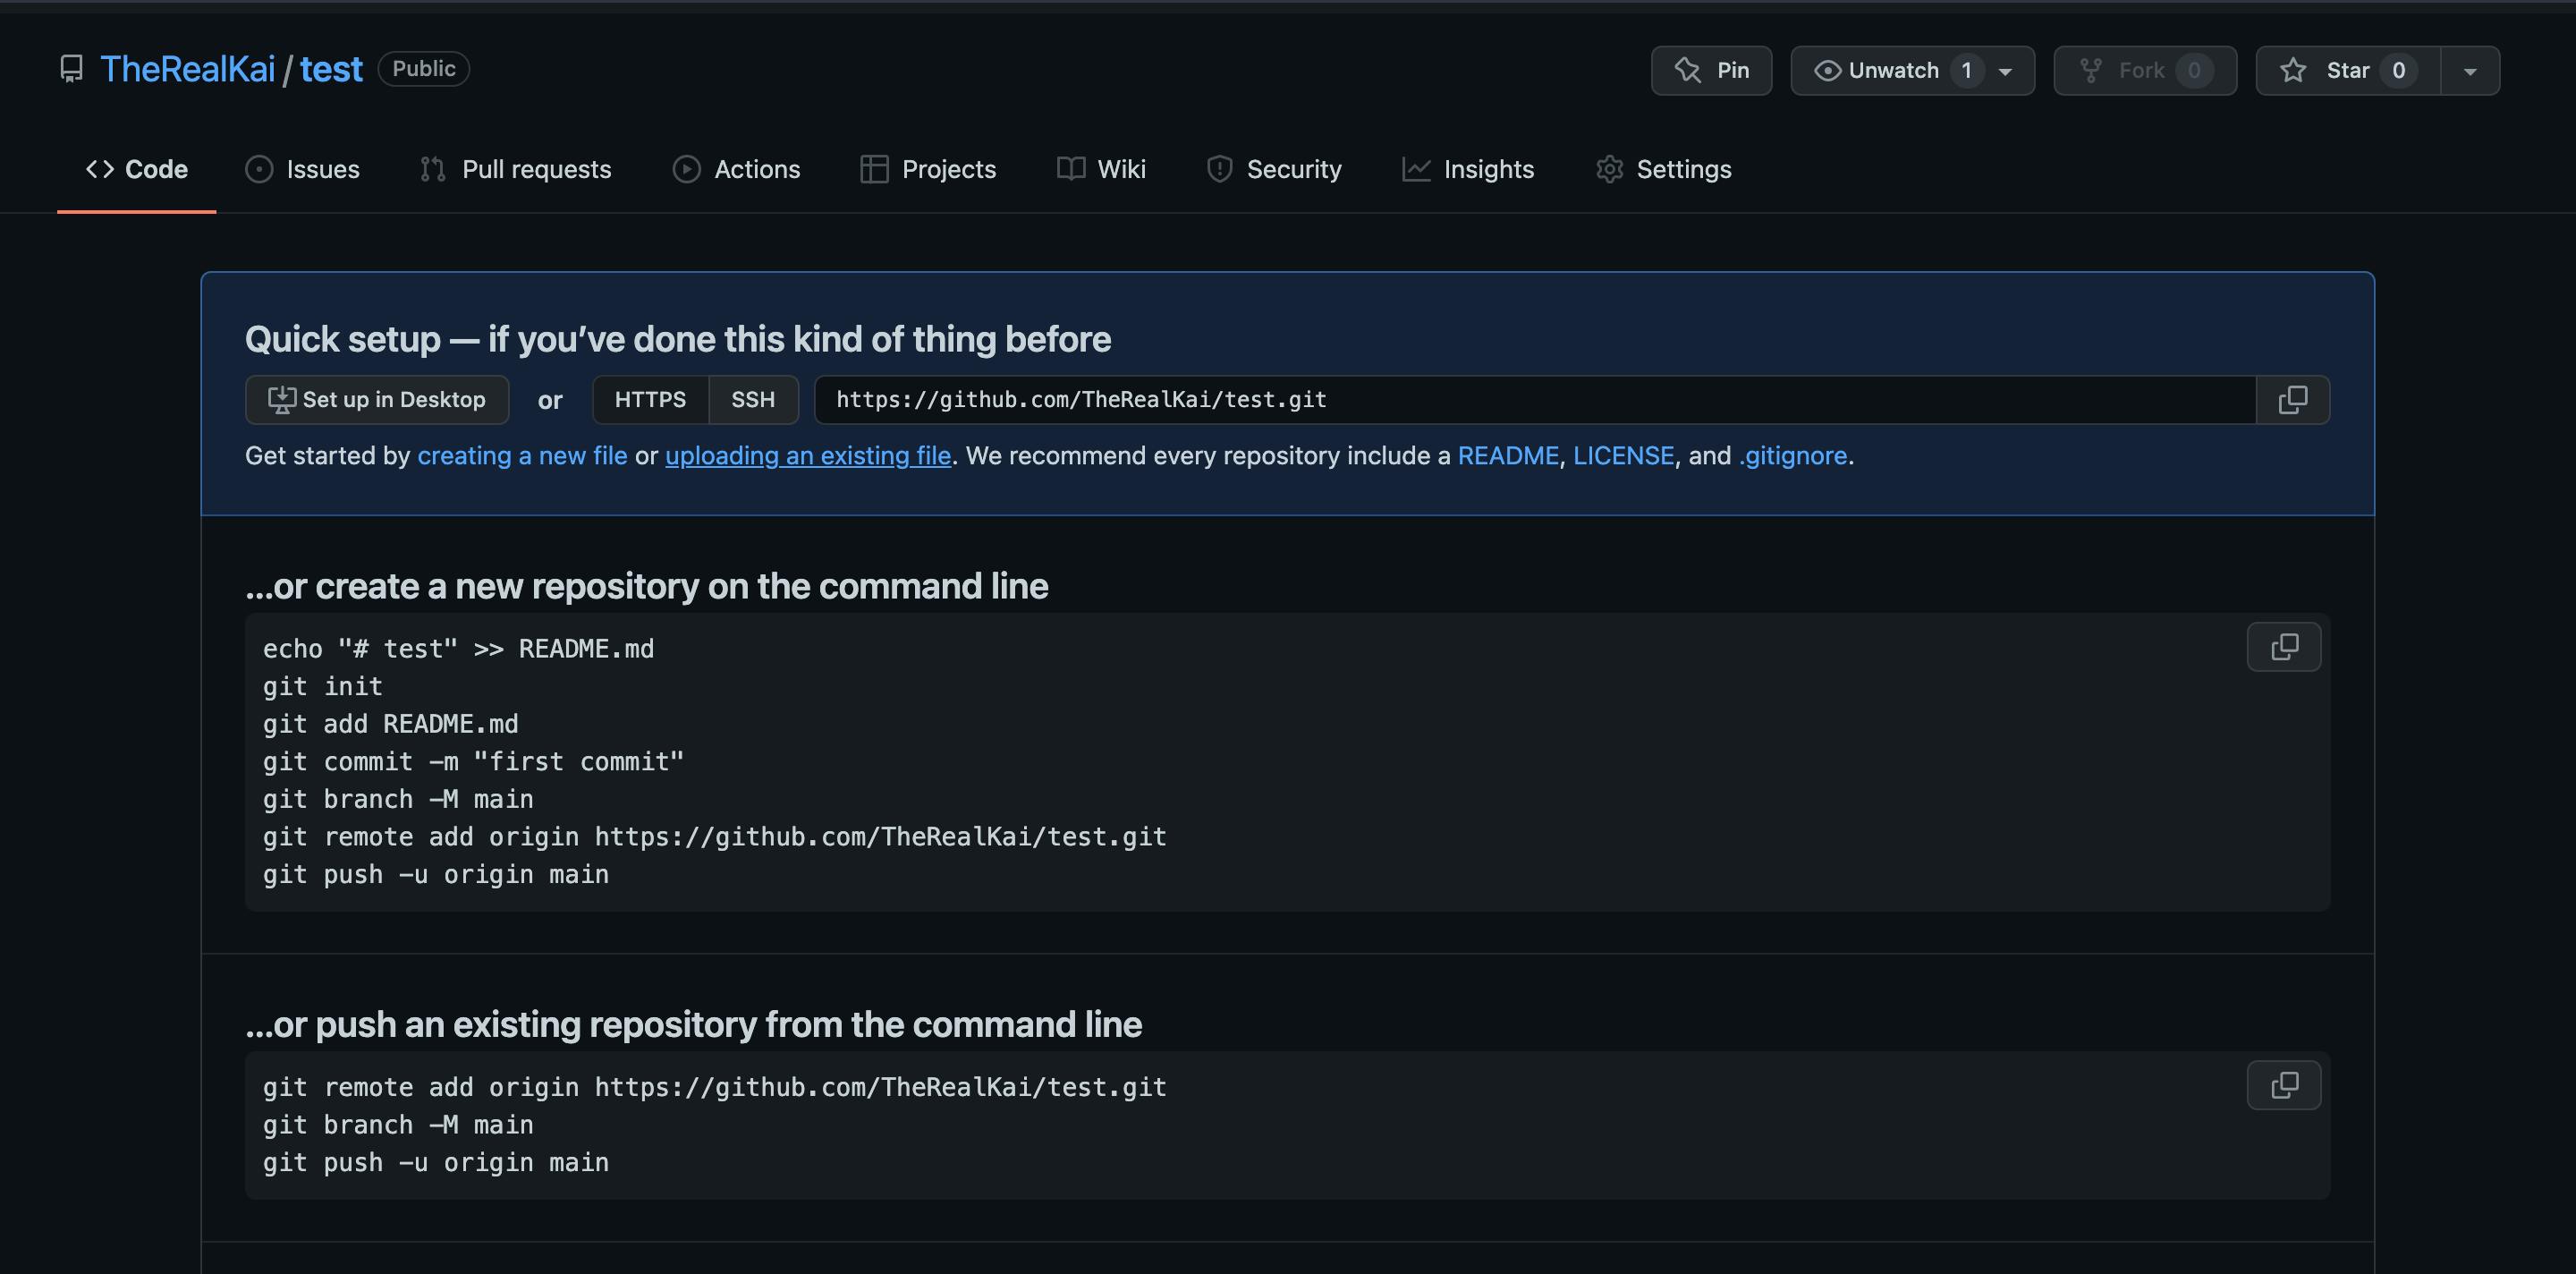
Create a Github account, then create a repository, by clicking on the
+in the top right. Name the repository anything you'd like and make it public. This is what you should see after you complete this:Now, go inside of your code editor, create an empty folder in your desired location, and create an
index.htmlfile. Add some basic HTML into your document (for help see this video).
Using Git
We now have the setup complete, now let's get to the reason you're here, let's use git! First, we should visualize git in a diagram:
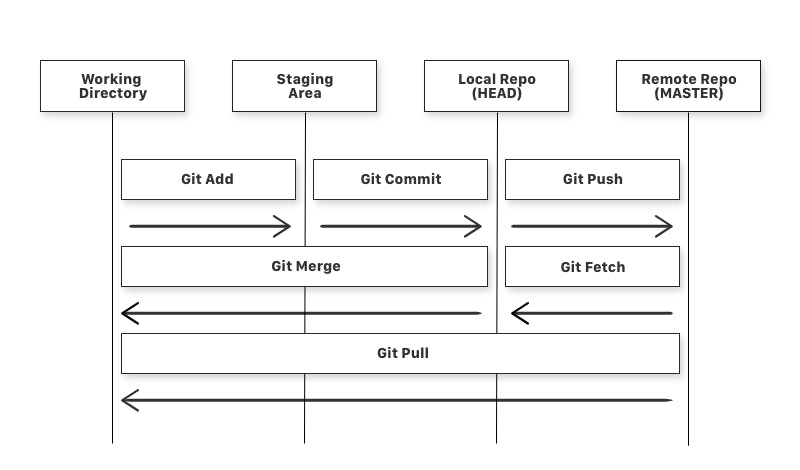 Diagram from this article
Using the commands
- First, we need to create a new local git repository. Open up your terminal and type:
git init
- Next, we add the file(s) from your working directory to the staging area. The command is:
git add <filename>
For our example:
git add index.html
- Next, we are going to commit our files from the staging area to the local repository. We do this with git commit, the
-mstands for message, add your commit message in the quotes.
git commit -m "<your commit message>"
Our message in this example is, initial commit
git commit -m "initial commit"
- Now, we must connect our local repository to our remote repository so we can push changes to it.
git remote add origin https://github.com/<github-username>/<repo-name>.git
For example, in my repository, it would look like this:
https://github.com/TheRealKai/test.git.
- Lastly we will push all of our committed code into your remote repository. After this, we will be able to see all of our code on Github.
git push -u origin main
Branches
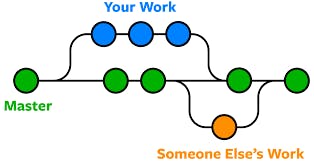 Thank you to this article for the image.
You can see the "master" (main) branch is the default branch. We can picture the main branch as the tree trunk and the branches we create are going to be.. branches. These branches enable us to create our own code that we can later merge with the main branch. In these branches we can complete tasks like fixing bugs, adding features, or implementing new ideas with no risk. We will create a branch to show you a basic example of how they work and what power they possess.
First, we will create a new branch. We use the following command to create a new branch with the name feature_x and it automatically switches to this branch.
git checkout -b <branch-name>For our example:
git checkout -b feature-xNow make some changes to the document in our new branch. Add them and commit them as we did before with the following commands:
git add index.html
git commit -m "Added information from feature_x"
- Now push these changes to the main origin by using the command
git push origin <branch-name>
in our case git push origin feature_x
This command pushes our changes to the remote repository, this will create a pull request in Github.
Now go onto Github to compare the pull request that we just made, you should see an incoming pull request, click on Compare & pull request. From here you should see an option to create the pull request, click on that button. Lastly, you can merge the pull request into the base branch, it should look something like this:
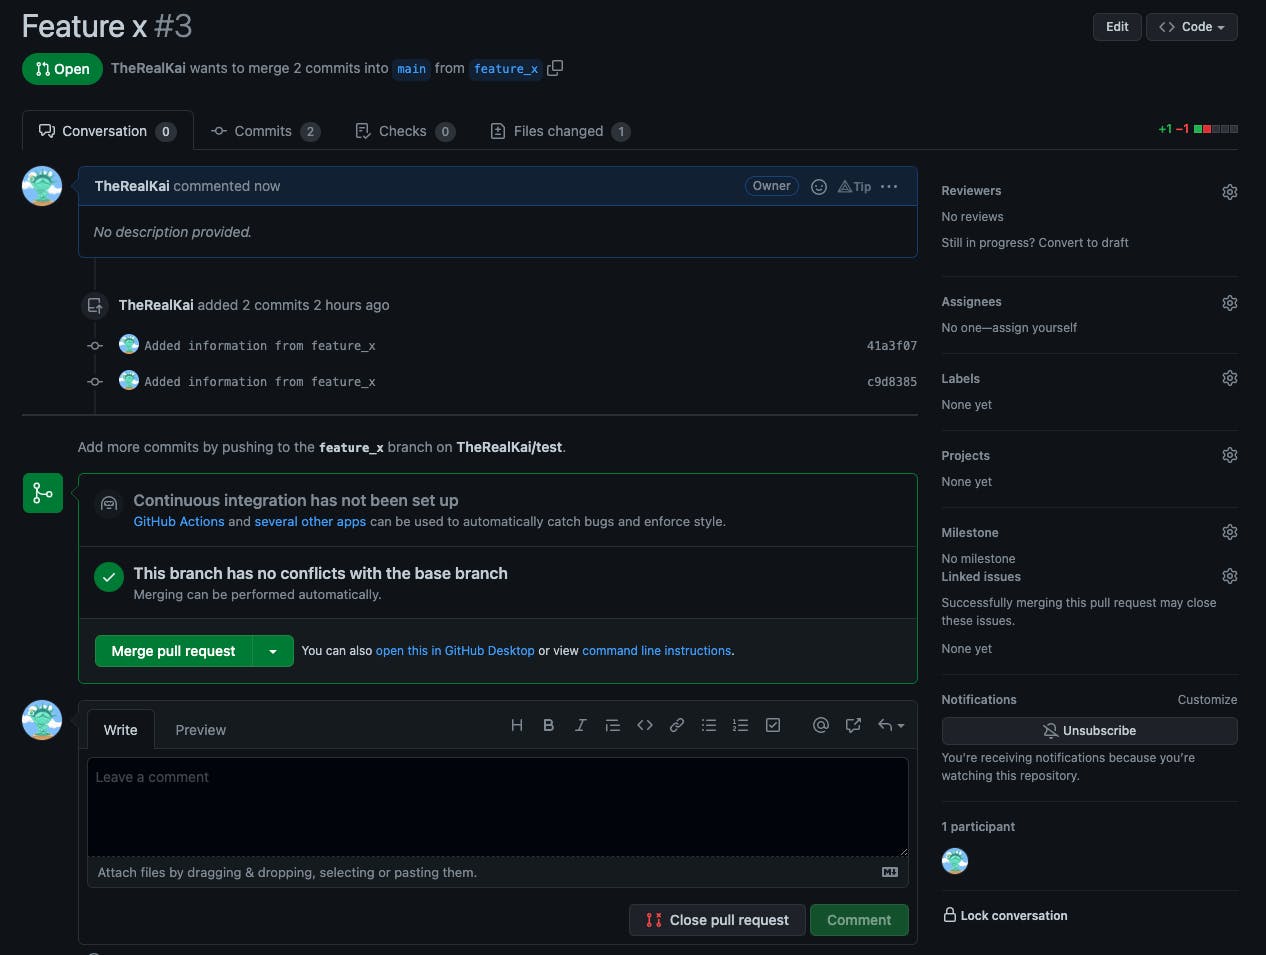
Now you know how to branch a repository, make your own changes, and push them to the main branch.
Useful commands
Here is a list of the commands all in one place that you can reference back to at any point. If you need further explanations, scroll up and look at our examples again.
General
git addis a command used to add the file(s) to the staging area.git commitis the command used to commit the file(s) from the staging area to the local repository.git pushis the command used to push the committed file(s) from the local repository to the remote repository.git pullis the command used to get files from the remote repository directly into the working directory. It is equivalent to a git fetch and a git merge.git remote add origin <remote-repo-name>adds a remote repository that we will use to push our commits to.git statusshows the status of the working tree.git logshows commit history.
Branches
git checkout -b <branch-name>creates a new branch and automatically switches to it.git checkout <branch-name>creates a new branchgit branchshows all branchesgit branch -d <branch-name>deletes a branch based on the branch name.git push origin <branch-name>pushes the branch to the main branch by creating a pull request.
Conclusion
Git is a powerful tool that every developer needs in their toolbox. It allows us to keep track of our code and collaborate with others effectively. Github is the home of all of our open-source projects. The diagram of the git workflow should be referenced frequently, along with the git commands until you are fully comfortable using it in every project.
I post blogs every weekend, if you enjoy this type of beginner content, I would appreciate any support on this article 🎉! If you have any suggestions please let me know in the comments or on Twitter and check me out on Github, thanks!